![]()
![]()
![]()
![]()
![]()
![]()
![]()
![]()
![]()
![]()
![]()
![]()
El sitio de internet en español para los modelistas militares dedicados a la Primera Guerra Mundial
Inicio Presentación Preguntas frecuentes Artículos Revisiones Galería Lista de kits
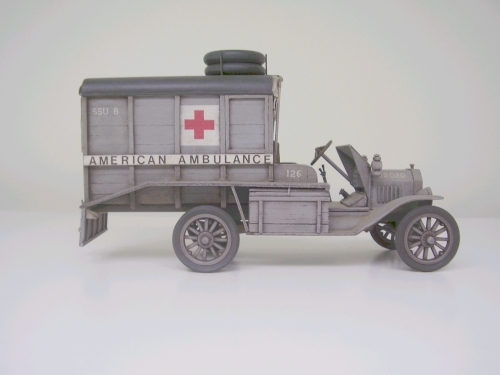
Ford Model T AFS Ambulance
Autor: Chris Anderson
 El
primitivo equipo y las armas usadas en la Primera Guerra Mundial (para los
niveles de hoy) siempre me han fascinado. Hace menos de cien años el tanque, el
avión, la ametralladora y el automóvil eran tan novedosos como los misiles
guiados por láser o el GPS hoy día. Quería construir una maqueta para
representar el sencillo Ford Modelo T tal como se usó en esa guerra. Siempre me
encantó el aspecto de la ambulancia Ford Modelo T, con sus ruedas largas y
delgadas y el cuerpo demasiado largo. Si alguna vez has visto uno en una vieja
película o en un noticiario, tienen un aspecto magnífico balanceándose por
sucios y embarrados caminos.
El
primitivo equipo y las armas usadas en la Primera Guerra Mundial (para los
niveles de hoy) siempre me han fascinado. Hace menos de cien años el tanque, el
avión, la ametralladora y el automóvil eran tan novedosos como los misiles
guiados por láser o el GPS hoy día. Quería construir una maqueta para
representar el sencillo Ford Modelo T tal como se usó en esa guerra. Siempre me
encantó el aspecto de la ambulancia Ford Modelo T, con sus ruedas largas y
delgadas y el cuerpo demasiado largo. Si alguna vez has visto uno en una vieja
película o en un noticiario, tienen un aspecto magnífico balanceándose por
sucios y embarrados caminos.
Llevaba construyendo maquetas desde 43 años cuando comencé este proyecto. Eché un vistazo en diferentes galerías de maquetas de la Gran Guerra. Todos los ejemplos que encontré eran a 1/72 (yo trabajo a 1/35); uno estaba a mi escala pero el hecho de que fuera en resina (algo que realmente no quería intentar) me hizo decidirme a hacer un “scratch”.
A principios de los 80 había hecho en “scratch” un FT-17 en madera de balsa. No creo que haya hoy en el mercado algo así, de forma que tuve que dibujar mis propios planos a partir de fotos. He hecho planos y construido muchos proyectos en escala N (1/160) de modelismo ferroviario.
Lo primero que hice para mi proyecto fue investigación y más investigación. Pienso que esto es muy importante e Internet un gran recurso. Encontré unos pocos sitios con información y especificaciones del Ford Modelo T. El sitio que más me ayudó para la maqueta de la ambulancia fue http://www.ourstory.info/ . Este es un sitio sobre la historia del AFS. Antes de que los Estados Unidos entraran en la Gran Guerra la AFS empleaba voluntarios americanos para llevar ambulancias a Francia (1914-1917). Este sitio tiene mucha información y fotos, me llevó meses hacerme una idea de lo que quería hacer. Creo que todavía hay partes de él que aún no he leído. Finalmente me decidí por el SSU nº8, reg. nº32020, en el verano de 1917. Encontré dos fotos del vehículo y me decidí a construirlo.
Para dibujar planos a 1/35, primero dibujé una vista lateral de una ambulancia
(es muy importante que el vehículo en la fotografía esté perpendicular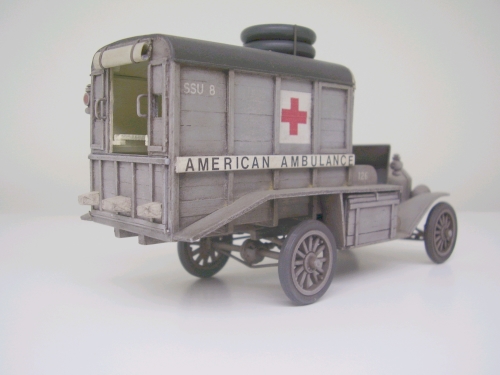 y al nivel del objetivo de la cámara). Las herramientas que se necesitan son:
escalímetro a 1/35, un compás
(de los que usan los delineantes),
papel de dibujo y un lápiz bien afilado. Ahora tomamos
medida de la desconocida escala de la fotografía.
y al nivel del objetivo de la cámara). Las herramientas que se necesitan son:
escalímetro a 1/35, un compás
(de los que usan los delineantes),
papel de dibujo y un lápiz bien afilado. Ahora tomamos
medida de la desconocida escala de la fotografía.
De las especificaciones del Ford Modelo T sabía que el diámetro de la rueda era de treinta pulgadas. Coloqué el compás en la rueda de la fotografía. Sobre el papel dibujé una línea comenzando con cero pulgadas, después reduje la dimensión con el compás. Sé que son 30 pulgadas, lo que son 2 pies y 6 pulgadas. Lo construí con un total de 12 pulgadas de largo. Ahora viene la parte divertida.
Fui usando el compás en cada segmento de la fotografía. Pude entonces obtener las dimensiones en pulgadas en el escalímetro. Dibujé un lateral, el frente, la parte superior y la trasera usando estas dimensiones pero a 1/35, con el escalímetro a 1/35. Comprobé todas las proporciones de forma que todo estuviera en su sitio.
Decidí que el vehículo de exploración Ford Modelo T a 1/35 de RPM sería un buen punto de partida. Mientras construía el chasis y ensamblaba el eje encontré que las dimensiones del kit eran incorrectas. Así que incrementé la longitud del chasis y el ancho del cuerpo usando plástico y eliminando las defensas traseras. No añadí las ruedas aún. Todo el tableado de madera se hace con tiras de madera de las que se usan en modelismo ferroviario.
Hay que hacer planos para cada fase del montaje. Se cubren esos planos con plástico o papel encerado, porque si no, se pegarán cuando usemos pegamento. Usando alfileres, clavamos las piezas sobre el plano y pegamos las piezas entre sí (como se hacía con la antigua madera de balsa en las maquetas de aviones). Yo empleo un tablero de fibra blanda para trabajar con esto.
Después de hacer el suelo trasero y tres laterales, pegué el suelo trasero y dos paredes adyacentes, manteniéndolo todo en ángulo recto y derecho. Luego añadí el banco y los raíles superiores para la camilla de arriba (hay una descripción y una buena foto del interior en el sitio web ya mencionado). Hice el techo trasero con tiras de madera y cubriéndolo con una fina pieza de madera de balsa. Luego pinté el interior del techo, la tercera pieza de pared interior y el interior del suelo trasero. Ahora la tercera pieza de pared y el techo se pueden añadir al resto. Dejé los paneles de las insignias para más tarde. Hay que recordar rascar la pintura de las superficies que van a ser pegadas y mantenerlo todo bien derecho y cuadrado.
Otras fases de montaje en madera son las defensas traseras, el suelo del conductor, la puerta trasera y las dos cajas laterales con estantes. Decidí que se pudieran abrir la puerta trasera y la de los cajones laterales. La puerta se pone con dos ganchos a cada lado. Las tapas de los cajones tienen bisagras y sólo las abrí unas pocas veces (no sabía cuántas veces se podían abrir antes de romperse). Puse tres latas de gasolina en la caja del lado del conductor. Hice el parachoques a partir de una tarjeta plástica. La capota, radiador y parachoques se añaden al chasis (todo esto son piezas de plástico). Después de añadir las dos cajas laterales de madera, sin colocar las tapas, comenzamos a pintar.
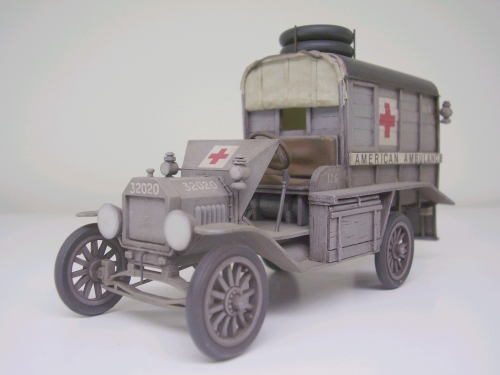
Estos vehículos franceses eran grises hasta la entrada de los Estados Unidos en la guerra, tras lo cual el AFS los pintó en verde. Pinté el exterior con un spray de esmalte gris, enmascarando el interior de la caja trasera. El ensamblaje del suelo del conductor se hizo de forma que deslizara entre los dos cajones laterales. Tras pintar a mano el depósito de gasolina, pedales, fondo de asiento y palanca de emergencia, lo pegué todo al conjunto del asiento del conductor. Este conjunto ahora se deslizaba sobre el chasis y entre los cajones laterales. La caja trasera se añadió después del respaldo del asiento, con cuidado de mantenerlo todo derecho.
Lo que llevó mucho tiempo fueron todas las partes de lona. Después de probar con diferentes materiales, terminé usando un fino papel de envoltorio de Blimpie (una tienda de bocadillos). Quería que el techo del conductor estuviera en posición baja. Coloqué el soporte del techo y enrollé un trozo de alambre. Luego dibujé y corté un trozo de papel y le di la forma de la lona del techo. Hice una "plantilla" para mantener el bastidor en su sitio y le pegué la lona. Esto representa el techo en posición abierta. Doblé el techo y luego pinté el montaje y lo pegué a la ambulancia.
Las bolsas de lona en la puerta trasera necesitaron de más imaginación. Primero hice un molde en madera de balsa al final de la bolsa de lona. Usando el mismo papel, corté un patrón. Doblé y pegué todo junto sobre el molde (como si fuera “origamy”) teniendo cuidado de que no cayera pegamento en el molde de madera. Después las separé del molde, las coloqué y las pinté. La bolsa en el centro necesitaba de un molde el doble de ancho.
 Añadí
los faros de delante y detrás, paneles de señales (con los transferibles ya
aplicados) y las defensas traseras de madera. La lona trasera va enrollada y se
le añaden dos tiras de papel. Esto se pintó y se pegó.
Añadí
los faros de delante y detrás, paneles de señales (con los transferibles ya
aplicados) y las defensas traseras de madera. La lona trasera va enrollada y se
le añaden dos tiras de papel. Esto se pintó y se pegó.
Para colocar correctamente rectas las ruedas al chasis, hice otra "plantilla" de panel de chapa y espuma. Sobre esta base hice cuatro recortes de tamaño adecuado para las ruedas, pegué éstas y las pinté.
Añadí los transferibles y los retoqué con pintura. Las llantas de repuesto y la manivela se añadieron al final. Esta maqueta me llevó mucho tiempo pero al final creo que valió la pena. También me dio una gran comprensión de lo que estos jóvenes y valientes voluntarios hicieron por un país que no era en suyo. Entre 1914 y 1917, 126 hombres del AFS perdieron la vida intentando salvar a otros. Si te gusta mi maqueta puede interesarte leer algo sobre estos poco conocidos valientes del AFS.
Para ver todas las imágenes de esta maqueta, pinchar aquí
Esta es una traducción autorizada del artículo original de Chris Anderson realizada por José Luis Chinchilla. El original en inglés se puede leer debajo del alambre.
![]()
FORD MODEL T AMBULANCE , A.F.S. 1917 FRANCE
1/35 model by Chris Anderson
The primitive equipment and weapons [by todays standards] used in W.W.1 always fascinated me. Less than a hundred years ago the tank, airplane, machine gun, and automobile were just as new to the world as laser guided missiles or the GPS of today. I wanted to build a model to represent the simple Ford model t as used in that war. I always loved the look of the Ford model t ambulance, it's spindly wheels and overly long body. If you have ever seen an old movie or news reel with one, they look great bouncing along on old dirt and mud roads.
I've been building models for over 43 years, so where to start on this project. I looked at different W.W.1 model gallery sites. All of the examples I found were 1/72 [I do 1/35 scale], one was in my scale but the fact it was in resin [something I didn't really want to try] made me decide to build my own from scratch.
In the early 1980's I scratch built, a French ft17 out of balsa wood. I don't think they had anything on the market yet so I had to draw my own prints from pictures. I've drawn prints and built many projects for my n-scale [1/160] model railroad, that way.
The first thing I did, for this project, was the research and more research. I think this is very important and the Internet is a great source. I found a few sites with Ford model t information and specifications . The site that was the most helpful for the model t ambulance was http://www.ourstory.info/ this is all about the history of the American Field Service. Before the United States entered the Great War the A.F.S. used American volunteers to drive ambulances for France [1914-1917]. That site has so much information and pictures, it took me months to get a good idea on what I wanted to do. I still think there are parts of it I haven't totally read yet. I finally decided on S.S.U.#8, reg.#32020 , in the summer of 1917. I did find two picture of the vehicle that I decided to build.
To draw the 1/35 scale print, first I printed out a large, full on, side view of an ambulance [it's very important that the car in the photograph be perpendicular and eye level to the camera]. The tools you will need from here are; 1/35 scale ruler, a pair of dividers [the kind draftsmen use], graph paper, and a good sharp pencil. Now I had to make a measuring ruler to the unknown scale of the photograph.
From the Ford model t specifications I knew the diameter of the wheel was 30 inches. I set the dividers to the outside of the wheel in the photograph. On the paper I drew a line starting with 0 inches, then I stepped off the dimension with the dividers. This I know to be 30 inches, which is also 2 foot-6 inches. Using my dividers I filled in the rest of the inches on my unknown scale ruler . I made it a total of 12 inches long. Now comes the fun part.
By setting my dividers to each line segment on the photograph I could then find that dimension in inches on the unknown scale ruler. Now I drew a side, front, top, and rear view using those dimensions but in 1/35 scale, using the 1/35 scale ruler. I kept cross checking all the proportions so everything would fit into place.
I decided the 1/35 R.P.M. Ford model t scout car would be a good starting point. While building the chassis and axle assembly I found the dimensions of the kit to be off. So I added to the length of the chassis and to the width of the body using plastic stock and I cut off the rear fenders. Don't add the wheels yet. All wood planking is made from scale strip wood [the kind model railroaders use].
You need to draw prints for each sub-assembly. Cover those prints with plastic wrap or wax paper or the parts will stick to the print when gluing. Using straight pins, pin down the pieces over the print and glue the pieces together [the way you build the old style balsa wood airplane models], I use a soft fiber type board to work on.
After building the rear floor and three side walls I glued the rear floor and two adjacent walls together, keeping everything square and straight. Then I added the folding benches, in the up position and the upper rails for the top stretcher [there is a description and great picture of the rear interior, on that web site]. I built the rear roof by making wood ribs and covering it with a thin piece of balsa wood. I then painted the interior of the roof, the third interior wall piece, and the interior of the rear floor sub-assembly off white. Now the third wall piece and roof can be attached to the rest. I left off the sign boards till later. Remember to scrape off the paint on the surfaces to be glued and keep everything square and straight.
Other sub-assembles to make from wood are the rear fenders, the driver floor, the tailgate and the two side storage boxes with shelves. I decided to make the tailgate and side storage box doors able to open. The tailgate attaches with two hooks on either side. The storage box doors have tape hinges, and I have only opened them a few times [I don't know how many times they can open before they may rip]. I put three gas cans in the driver side storage box. I made the dash cowling from plastic card stock and glued it to the dash. The front fenders, hood, radiator and the dash can be attached to the chassis [these are all plastic parts]. After adding the two wooden side storage boxes, leaving off their doors, I started painting.
These French vehicles where gray and not till the U.S. entered the war and took over the A.F.S. did they get green paint. I painted the exterior of the parts using a spray can of gray enamel primer. Masking off the inside of the rear box. The driver floor assembly was made to slide in between the two side storage boxes.After hand painting the gas tank, foot pedals, seat bottom, and emergency lever I glued them to driver floor assembly.This assembly was now slid in between the side boxes on the chassis. The rear box assembly was added next after attaching the seat back, being careful to keep everything straight.
The thing that took me along time to figure out was what to use for all the canvas parts. After experimenting with different materials, I ended up using a very thin paper wrapper from Blimpie [this is a sandwich shop]. I wanted the driver's roof to be in a down position. I layed out the roof bow and bent a piece of brass wire to that shape. Then I drew and cut out a piece of paper to the size and shape of the roof canvas. I made a " jig " to hold the bow in place, horizontal and glued the canvas to it. This would represent the roof in an up position. Now I folded the roof flat. I then painted this assembly and attached it to the ambulance.
The canvas pockets in the tailgate took a little more imagination, first I made a balsa-wood mold to the final shape of the canvas pocket. Using the same paper, I cut out a pattern. I folded and glued it together over the mold [ like Origamy ] being careful not to get any glue on the wood mold. After I removed them from the mold I installed and painted them. The pocket in the middle needed a wider mold, it's twice the width.
Now I added the head lights, side and rear lamps, sign boards [with the dry transfers already applied ]and the rear wooden fenders. The rear canvas flap was rolled up and two paper tie straps added. This was painted and glued on.
To keep the wheels true and square to the chassis I made another " jig " of plywood and foam board. On this base I made four cut-outs for the wheels the proper spacing and now glued the painted wheels on.
I added the dry transfers, touched up the paint and did the weathering. The spare tires and hand crank were added last. This model took a long long time but I think all the research paid off. I also have a greater appreciation and understanding of what these brave young volunteers gave, for a country that was not their own. I read that, between 1914-1917, 126 men in the A.F.S. lost their lives while trying to save others. If you like my model, give it a try. Or at least read about these little known brave heros of the A.F.S.
Thank You,
Chris Anderson
"Tous et tout pour la France."